
How to download and install MacOS Ventura on your Mac, MacBook
- Views: 340
Apple has released MacOS Ventura for all supported Macs, iMacs and MacBooks. Here’s an easy guide of how you can install it on your PC.
Highlights
- Apple recently released MacOS Ventura on all supported laptops and PC.
- MacOS Ventura is the successor to last year’s MacOS Monterey.
- MacOS Ventura update is available on MacBook Air released in 2018 and later.
Apple recently released the next gen macOS dubbed as MacOS Ventura to all supported Apple laptops and desktops. The MacOS Monterey successor brings improvements to Safari, Spotlight, Stage Manager and Passkeys. It also brings a host of new features such as Continuity Camera, and updates to Messages app, Mail app, and Photos app among other things.
If you are using a MacBook laptop, an iMac or a Mac PC, here is an easy guide that will help you download and install MacOS Ventura on your Apple PC:
How to download and install MacOS Ventura on your Apple PC
Step 1: Choose System Settings from the Apple menu in the corner of your screen. Also Read – Apple’s new Mac Pro to come with 48 CPU core M2 chip
Step 2: Now click on the General Settings option in the sidebar.
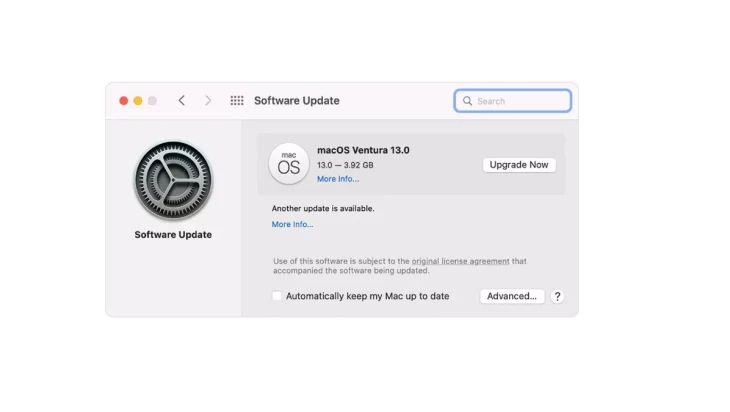
Step 3: Next, click on the Software Update option on the right side of the dialog box.
Step 4: Alternatively, you can choose System Preferences option and then click on the Software Update option.
Step 5: If the Software Update finds new a software update for you, which in this case will be MacOS 13 Ventura, click on the Update Now or Upgrade Now button to install it.
Step 6: Once the process begins, you may be asked to enter your administrator password during the installation process.
Also, Apple advises users to backup all of their data before updating their laptops and personal computers to avoid losing it in case of a patchy update. So, here is an easy guide that will help you backup your Mac.
How to back up your Mac data via iCloud Drive
Step 1: From your Mac, choose Apple menu and then go to System Preferences.
Step 2: Now click on Apple ID and then click on iCloud option.
Step 3: Ensure that iCloud Drive is turned on. Click on the Options button next to iCloud Drive.
Step 4: Choose Desktop & Documents Folders.
Step 5: Click Done.
How to back up your Mac data via Time Machine
Step 1: Open Time Machine settings from the Time Machine menu in the menu bar. Or choose Apple menu > System Settings > General > click Time Machine.
Step 2: In Time Machine settings, select your external storage device as your backup destination. Click Select Backup Disk and then follow the on-screen instructions.
Step 3: Start a new backup instead.
Once you select your storage device in Time Machine settings, Time Machine will automatically begin making periodic backups.
Step 4: But if you want to make a backup manually without waiting for the next automatic update, choose Back Up Now from the Time Machine menu in the menu bar.